Sign Up
You can sign up for Security365 on the Security365 Portal and Microsoft Teams platform.
1. How to sign up on the Security365 Portal
This document provides a step-by-step guide on how to register through the Security365 Portal.
Step 1: Access the portal site and start membership registration
- Access the [Security365 Portal].
- in the lower left corner of the login window
등록하기Click the button.
Step 2: Choose a Registration Method
The screen for selecting a membership registration method will be displayed. Please choose the registration method that suits your situation.
Membership Registration Guide
New Registration (Register as Administrator)
- Create an organization using Security365 for the first time.
- You have administrator privileges and can manage all settings of the organization.
- Choose in the following cases:
- If your company is using Security365 for the first time
- When Administrator Privileges Are Required
Registering in the Organization (Joining as a Regular User)
- Join as a regular user of an already created organization.
- You need the organization code provided by the organization administrator.
- You can use the service within the scope of permissions granted by the organization administrator.
- Choose in the following cases:
- If you are already using Security365 in your company
This guide will cover**New Registration (Administrator)**It explains based on the method.
Step 3: Register Organization Name
Enter the organization name to be used in Security365. The organization name is a unique name that identifies your company.
Precautions for Entering Organization Name
- number of charactersYou must enter between 1 and 80 characters.
- Available Characters: Only Korean, English, numbers, and spaces can be used.
- Special Character Limit: The first character cannot be a special character.
- ⚠️ Important: Once registered, the organization name cannot be modified, so please enter it carefully.
- ⚠️ No duplication: You cannot use the same name as another organization.
After entering the organization name
다음Click the button.
Step 4: Register Administrator Information
This is the step to create an administrator account for the organization. You can choose one of two methods.
Method 1: Create a Security365 account by entering information directly
This is how to create an account by filling out the information input fields on the left.
Input Item
gender: Enter the administrator's last name.
name: Enter the administrator's name.
id: Enter your ID.
email:
Enter your email address.
인증 코드 발송Click the button to receive the authentication code.Enter the verification code sent to your email to complete the email verification.
The authentication code is valid for 5 minutes, and upon expiration,
재발송You can click the button to receive it again.
Authentication Number: Enter the verification code received via email.
password:
- Enter the password to be used for login.
- The initial administrator password must meet the following conditions:
Including uppercase and lowercase letters
Include numbers
Special characters included
8 characters or more
- Password Confirmation: Enter the password you entered above again to confirm.
After entering all the information
계정 생성Click the button.Method 2: Register with a Microsoft Admin Account
bottom of the
MS 관리자 계정으로 가입This is how to sign up with a Microsoft account by clicking the button.Prerequisites
To register with a Microsoft 365 admin account, you need one or more of the following roles:
- Authorized Role Administrator
- Cloud Application Administrator
- Office App Administrator
⚠️ Reference: If you do not have the necessary permissions, request permission from your IT administrator or use the direct input method in Method 1. For information on how to check and grant permissions, please refer to the Microsoft 365 administrator permissions guide section below.
Registration Procedure
MS 관리자 계정으로 가입Click the button.When the Microsoft login page is displayed, log in with your Microsoft account.
When login is successful, a consent screen for delegating permissions for registering the Security365 app will appear.
This permission consent is a necessary procedure for Security365 to smoothly integrate with Microsoft.
Through this agreement, you will be able to utilize the features provided by Microsoft when using Security365.
수락Click the button to agree to the delegation of authority.
- After agreeing to the delegation of authority, it is automatically checked whether the account has an administrator role.
If the authorization delegation consent popup does not appear
The permission delegation consent popup does not appear in the following cases:
- If the Security365 app is an already registered account (no separate consent is required)
- In the case of On-Premise (Single-Tenant) environment (an Azure app with required permissions has already been created)
Registration Failure
If there is no administrator role, the following message will be displayed and registration is not possible.
In this case, request the necessary permissions from the administrator, or sign up using the direct input method from Method 1.
Microsoft 365 Admin Permissions Guide
This document provides guidance on the administrator permissions required to use the Microsoft integration feature in Security365.
Required Roles
Below roles amongat least 1It must be assigned to the account.
role Description Global Administrator Access to all management features (recommended) Privileged Role Administrator Role Assignment and Management Cloud Application Administrator App registration and enterprise app management available Teams Administrator Teams service management available Office App Administrator Manage Office app settings Point in Time When Permissions Are Required
point of view Description When signing up for Security365 with a MS account Initial App Registration and Permission Delegation Consent When connecting user/group synchronization for the first time Most common case. MS Graph API permissions required. When you press the "Sync Now" button but the sync connection is disconnected. Reconnection due to permission expiration or revocation When Security365 was updated to a version that requires new Graph permissions Additional Authorization Delegation Consent Required When changing the On-Premise/Multi-Tenant operating model App Registration Configuration Change When an additional administrator is registered via Teams Teams app permission delegation consent ⚠️ Permission Revocation Guide: The above permission can be revoked after the task is completed without affecting general service usage. However, if the above task is needed again, temporary re-granting will be required.
Method 1: Microsoft 365 Admin Center
- Microsoft 365 Admin CenterAccessing.
- In the left menuUser > Active UserClick.
- Click the user to check permissions.
- In the right detail panelroleChecking the item.
- Check if the necessary roles are assigned.
Method 2: Microsoft Entra ID (Azure AD)
- As a global administrator account of the tenantMicrosoft Entra admin centerAccessing.
- ID > User > All UsersSearch for and select the user in.
- Click on **Assigned roles** in the left menu.
- Check if there are required roles in the assigned role list.
Authorization Method
If the necessary roles are not assigned, request role assignment from the global administrator of the tenant.
- Microsoft 365 Admin CenterLog in with the global administrator account.
- User > Active UserClick on the user to grant permissions.
- Role ManagementClick.
- Select and assign the necessary roles.
Step 5: Login
Once the administrator account creation is complete, log in to the Security365 Portal with the created account.
- If you signed up using the manual entry method: Log in with the created ID and password.
- If you signed up with a Microsoft account: Log in with your Microsoft account.
Step 6: Choose a Product Subscription
After logging in, a modal window for selecting a subscription service will be displayed automatically.
How to Choose a Service
Select the Security365 service to use.
You can select multiple services at the same time.
The services not selected can be subscribed to later.
- After selecting the service
확인Click the button.- After final confirmation of the selected service list
확인Click the button to register the service and receive the license.If an error occurs during service registration
If some service registrations have failed:
- Only failed services can be retried.
- If you continue to fail, please contact the administrator.
- You can complete the registration excluding the failed services.
2. How to Sign Up for SHIELD Drive on Microsoft Teams
1. Microsoft Teams Login
- Microsoft TeamsAccessing.
- Microsoft Administrator Accountafter logging in with
TeamsEntering the dashboard.2. SHIELD Drive Activation
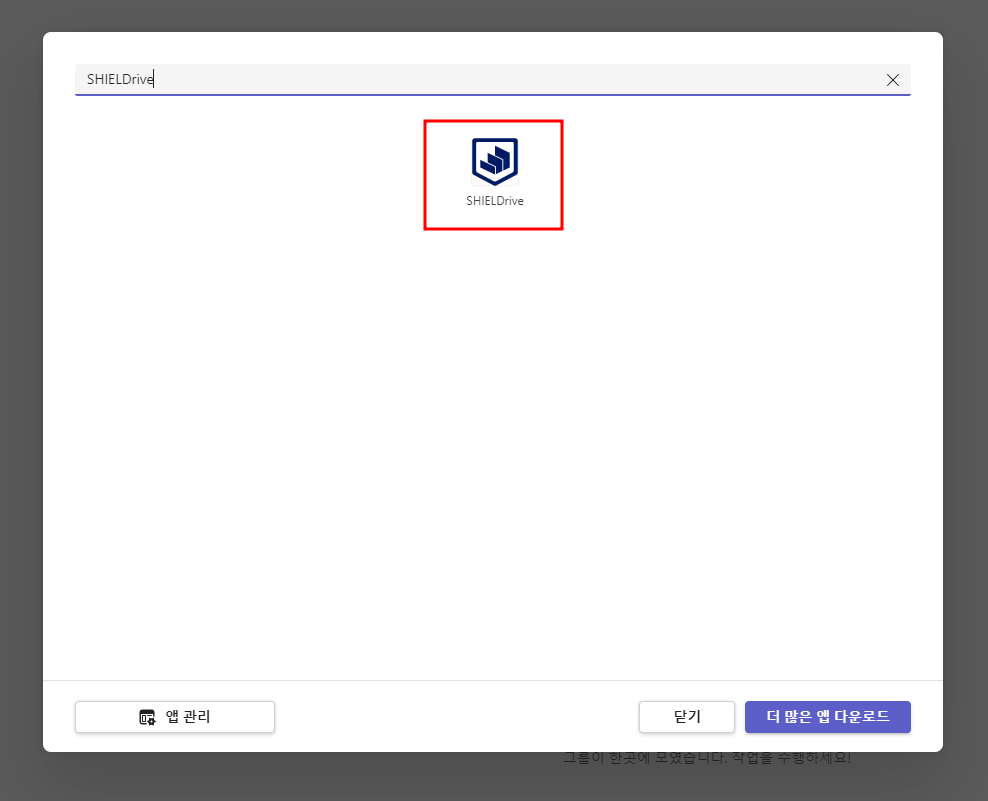
- To add SHIELD Drive
팀After clicking __PH_0__, at the top of the dashboard __PH_1__+(탭추가)Click the button.- After searching for SHIELD Drive in the app search bar, click on the SHIELD Drive app.
3. SHIELD Drive Basic Settings
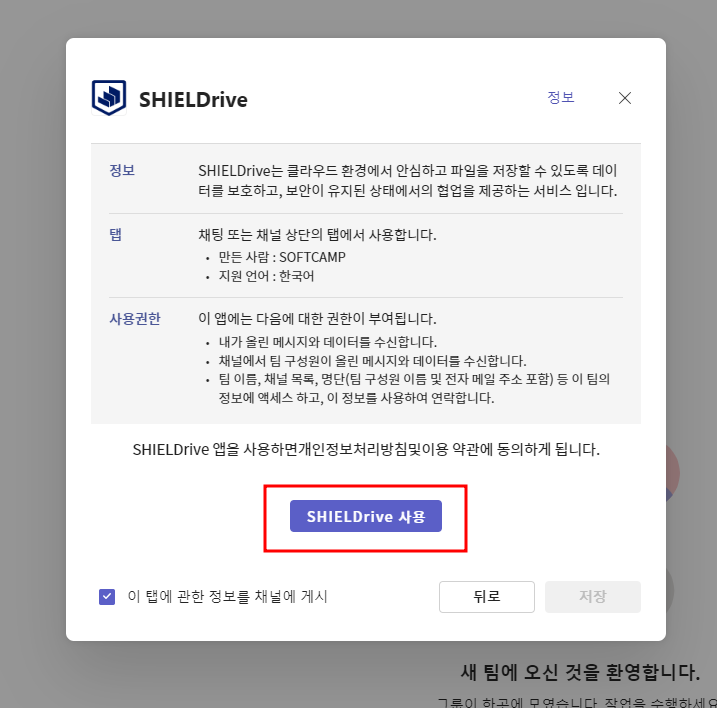
- After checking the SHIELD Drive information and permissions,
SHIELD Drive 사용Click the button.
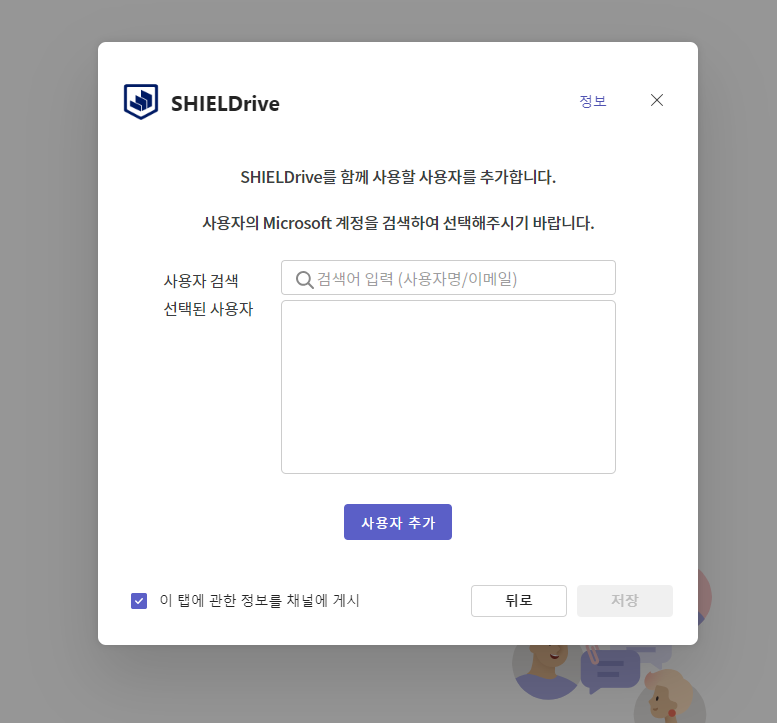
- After adding the users to be granted the SHIELD Drive license,
사용자 추가Click the button.
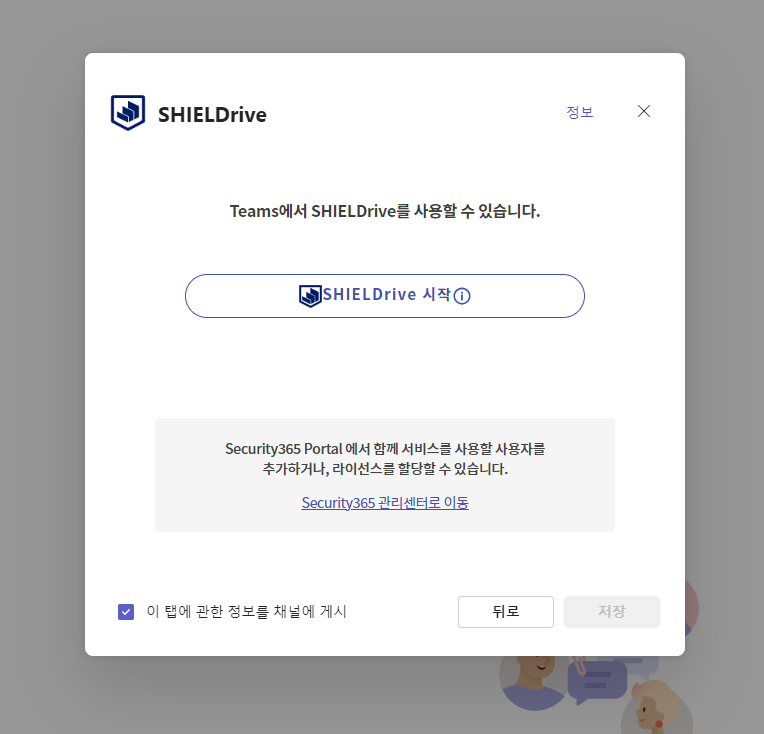
SHIELD Drive 시작Click the button.
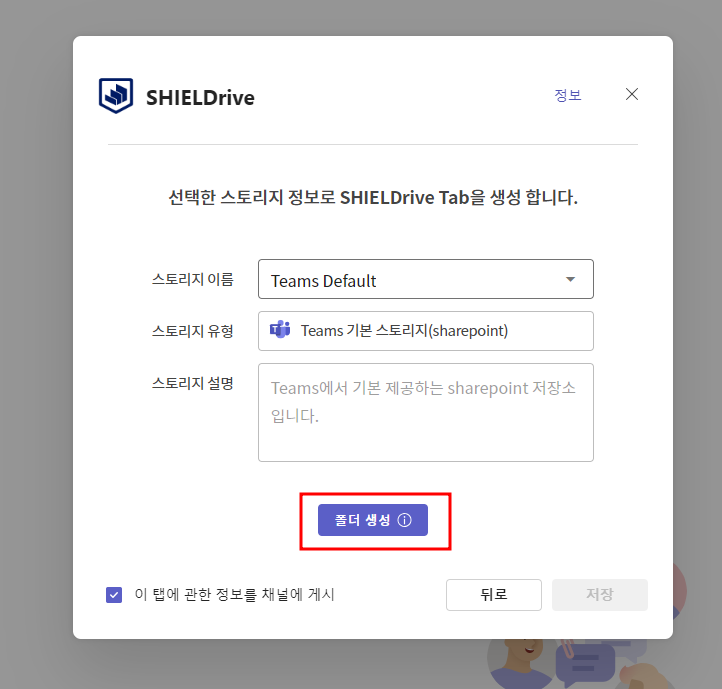
폴더 생성Click the button to create SHIELD Drive storage.저장Click the button to complete the registration.
- The organization name is registered as the tenant name associated with the administrator account.
- A SHIELD Drive license is automatically granted to the added user.